


Welcome to part 3 of the flutter testing series. By this point you are already familiar with writing unit tests and widget and page tests in flutter. If you have not already, I highly recommend you to go through the earlier parts in the series:
In this part, you will learn about Golden Tests.
What are Golden Tests?
Structurally, golden tests are very similar to widget tests. While widget tests verify the behaviour of widgets, golden tests verify the visual appearance of those widgets. Golden tests generate a screenshot of the current widget you are testing and compares it against a reference image. If both the images match, the test will pass. These images that are used as reference are called goldens and thus the tests are named as golden tests.
Similar to widget test, golden tests can be for a small individual widget or for a group of widgets or the entire page as well.
Why write Golden Tests?
If golden tests are very similar to widget tests, why to even write such tests? After all, in a widget test, we do verify that the necessary widgets for a given state are displayed. Let’s understand this with an example.
Consider the following list items. Each list item has a row which contains a text widget and an icon widget.

You can verify that the icon is display with the following expect statement.
expect(find.byIcon(Icons.favorite_border), findsOneWidget);
Now let’s say someone changes the code and switches the position of the icon with the text field.

Even though this was an unwanted change to the UI, the widget test will still pass. This is because in a widget test, you are verifying the presence of a widget but not its position. A widget test cannot safeguard you again such UI changes. That is where golden tests come into picture.
Starter Project
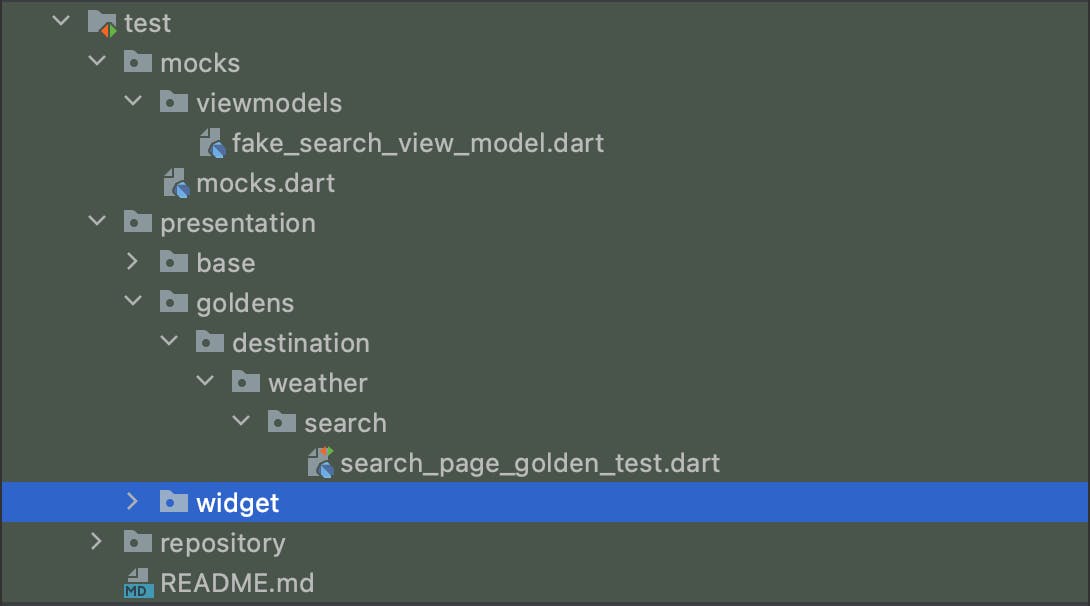
If you have not already, clone the flutter-testing repo from here. Checkout the golden-test-start branch and open it in the IDE. You should see the following directory structure.
Unlike the previous parts in this series, the golden-test-start branch already has some setup code. Since the test setup part is same as widget test, you have already seen it in part 1 and 2.
Golden Test Setup
In part 2, you wrote tests for individual widgets. In this tutorial, you will write golden tests for an entire page. Most of the setup code is already present. The important files you can have a look at are:
fake_search_view_model.dart: This flutter application uses riverpod for state management and this is where the view model is mocked. This part of mocking will vary based on the state management you are using in your application.
class FakeSearchViewModel extends SearchViewModel with Mock {
  FakeSearchViewModel(SearchScreenState state) : super(state);

  String _searchTerm = "";

  @override
  String get searchTerm => _searchTerm;

  updateSearchTerm(String newTerm) {
    _searchTerm = newTerm;
  }
}
test_helpers.dart: This file has a function that will do the one time setup required before all the tests in a test file start running. The setup in this function is again very application specific and will vary according to the libraries that your application is using.
void baseSetupAll() {
  FlavorConfig.initialize(
    flavor: Flavor.dev,
    values: const FlavorValues(apiBaseUrl: ""),
  );
}
widget_tester_ext.dart: This is the file you created in part 1 to make it easier to load widgets for testing. Similar to the loadWidgets function you added previously, the loadPageForGolden function extracts all the common parent widgets that are required for a page to load.
Future loadPageForGolden({
    required Widget page,
    required AutoDisposeStateNotifierProvider viewModelProvider,
    required AutoDisposeStateNotifierProvider fakeViewModelProvider,
  }) async {
    TestWidgetsFlutterBinding.ensureInitialized();
    SharedPreferences.setMockInitialValues({});
    await EasyLocalization.ensureInitialized();

    await pumpWidget(
      EasyLocalization(
        supportedLocales: const [Locale("en", "US")],
        path: "assets/translations",
        fallbackLocale: const Locale("en", "US"),
        assetLoader: const CodegenLoader(),
        child: Builder(builder: (context) {
          return MaterialApp(
            theme: lightTheme,
            debugShowCheckedModeBanner: false,
            darkTheme: darkTheme,
            themeMode: ThemeMode.dark,
            localizationsDelegates: context.localizationDelegates,
            supportedLocales: context.supportedLocales,
            home: ProviderScope(
              overrides: [
                viewModelProvider.overrideWithProvider(fakeViewModelProvider),
              ],
              child: page,
            ),
          );
        }),
      ),
    );
    await pumpAndSettle();
  }
Writing a Golden Test
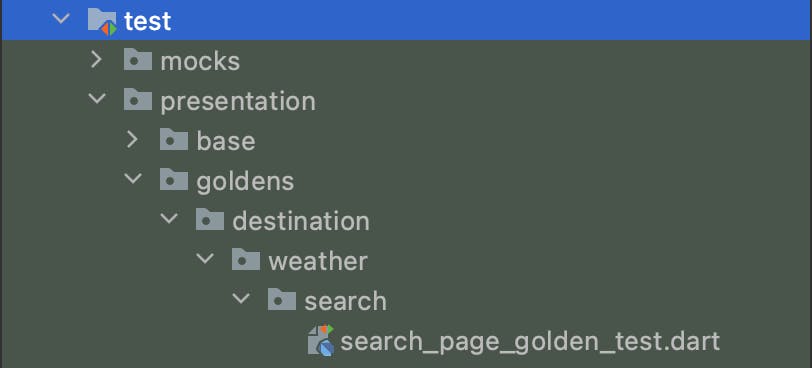
Open the search_page_golden_test.dart file located in the presentation/goldens directory.
It has some code already present to replace the mock the state management solution. The _loadPageForGolden helper method is setup to load the SearchPage which you will be testing. It also uses the baseSetupAll method form the test helpers.
void main() {
  late FakeSearchViewModel fakeSearchViewModel;

  var _fakeSearchViewModelProvider =
      StateNotifierProvider.autoDispose<SearchViewModel, SearchScreenState>(
          (ref) {
    fakeSearchViewModel = FakeSearchViewModel(SearchScreenState(
      toolbar: UIToolbar(
        title: LocaleKeys.searchPageTitle,
        hasBackButton: true,
      ),
      showLoading: false,
      searchList: List.empty(),
    ));
    return fakeSearchViewModel;
  });

  setUpAll(baseSetupAll);

  setUp(() {});

  tearDown(() {
    resetMocktailState();
  });

  _loadPageForGolden(WidgetTester tester) async {
    await tester.loadPageForGolden(
      page: const SearchPage(),
      viewModelProvider: searchViewModelProvider,
      fakeViewModelProvider: _fakeSearchViewModelProvider,
    );
  }
}
Add a widget test to verify if the result list is displayed correctly. Use the _loadPageForGolden method to load the page for the test.
testWidgets(
  "Given search results are not empty, When non empty search term is present, Then results should be displayed",
  (tester) async {
    // Given
    await _loadPageForGolden(tester);

    // When

    // Then

  },
);
Now since you are testing a page that reacts to changes in data from the state management solution, you need to update the state with the required data. Set the state with the list that you want to display along with setting the loading state to false. setState is a custom function on the view model that will update the state. Use pumpAndSettle to advance the rendering until the list is loaded and any animation is completed.
testWidgets(
    "Given search results are not empty, When non empty search term is present, Then results should be displayed",
    (tester) async {
      // Given
      await _loadPageForGolden(tester);

      // When
      fakeSearchViewModel
          .setState((state) => state.copyWith(showLoading: false, searchList: [
        UICity(
          cityId: 1,
          title: "title",
          locationType: "locationType",
          location: "location",
          isFavourite: true,
        ),
        UICity(
          cityId: 2,
          title: "title 2",
          locationType: "locationType 2",
          location: "location 2",
          isFavourite: false,
        ),
      ]));
      await tester.pumpAndSettle();

      // Then

    },
  );
Next add expect statements similar to what you wrote for widget tests.
testWidgets(
    "Given search results are not empty, When non empty search term is present, Then results should be displayed",
    (tester) async {
      // Given
      await _loadPageForGolden(tester);

      // When
      fakeSearchViewModel
          .setState((state) => state.copyWith(showLoading: false, searchList: [
        UICity(
          cityId: 1,
          title: "title",
          locationType: "locationType",
          location: "location",
          isFavourite: true,
        ),
        UICity(
          cityId: 2,
          title: "title 2",
          locationType: "locationType 2",
          location: "location 2",
          isFavourite: false,
        ),
      ]));
      await tester.pumpAndSettle();

      // Then
      expect(find.byType(TextField), findsOneWidget);
      expect(find.byType(SearchPageLoadingShimmer), findsNothing);
      expect(find.text(englishUS[LocaleKeys.noResultsFound]), findsNothing);
      expect(find.byType(UICityListItem), findsNWidgets(2));
    },
  );
At this point, you have a normal widget test for the SearchPage. You can run the test and see the following output.

To convert this to a golden test, you will add one more expect statement. The expectLater function can wait for a matcher to complete processing. You will use the expectLater to wait for the matchesGoldenFile function to complete its execution. matchesGoldenFile is a function that matches the png images at the given path to the widget that you provide to the expectLater function. Here you are testing the entire page, so you will select the entire page to be compared.
testWidgets(
    "Given search results are not empty, When non empty search term is present, Then results should be displayed",
    (tester) async {
      // Given
      ...

      // When
      ...

      // Then
      ...
      await expectLater(find.byType(SearchPage), matchesGoldenFile("search_page_results_golden.png"));
    },
  );
If you run this test now, it will fail with the following error. You are asking the test to match the SearchPage widget with the file seach_page_results_golden.png, but this file is not yet created.

To generate the golden file, we need to instruct the testing framework to do so. Run the following command to generate the golden file.
flutter test --update-goldens
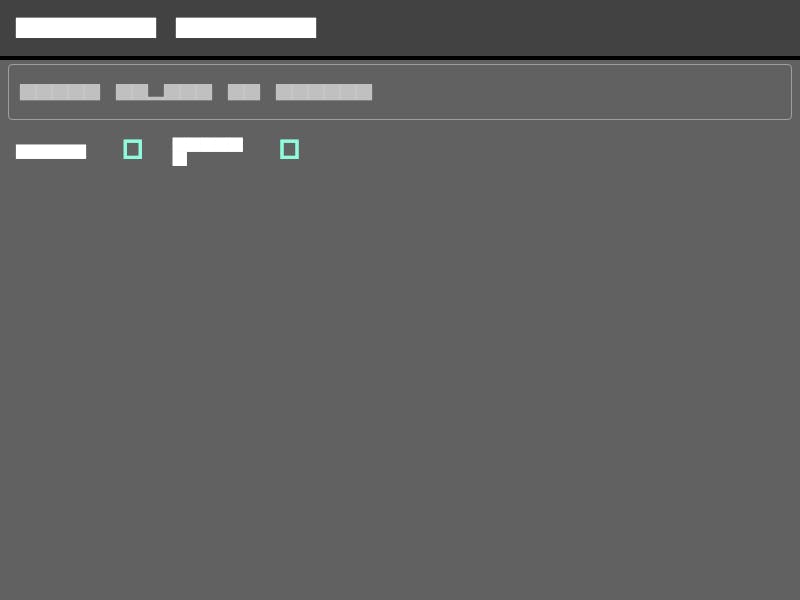
Once the command finishes running, you will see that the golden file is generated.

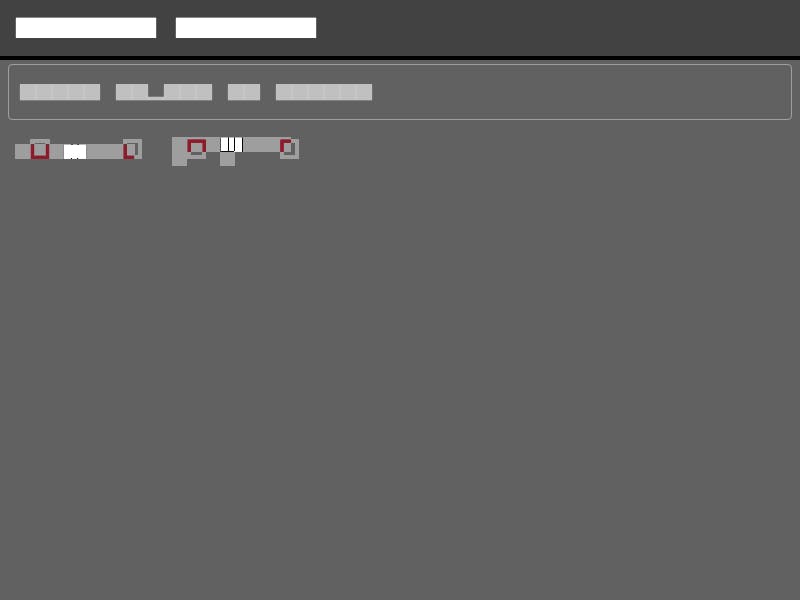
It should look something like this. It might look weird because flutter does not render text or icons in a golden test. Also the size is not of a typical phone, but that of a tablet or a desktop. Because of the bigger size the page is rendering a grid view instead of a list. We will look at how to fix all of these issues later in the tutorial.
Try running the tests normally again. You will notice that it passes this time.

Golden test failures
Open the ui_city_list_item.dart file. It has a Row with two children, Text and IconButton.
@override
Widget build(BuildContext context) {
  return Padding(
    padding: const EdgeInsets.all(8.0),
    child: Row(
      mainAxisAlignment: MainAxisAlignment.spaceBetween,
      children: [
        Expanded(child: Text(city.title)),
        IconButton(
          icon: Icon(
            city.isFavourite ? Icons.favorite: Icons.favorite_outline,
            color: Theme.of(context).colorScheme.secondary,
          ),
          onPressed: () {
            sink.add(SearchScreenIntent.toggleFavorite(city: city));
          },
        ),
      ],
    ),
  );
}
Swap the position of the children so that the IconButton is first and the Text is second.
@override
  Widget build(BuildContext context) {
    return Padding(
      padding: const EdgeInsets.all(8.0),
      child: Row(
        mainAxisAlignment: MainAxisAlignment.spaceBetween,
        children: [
          IconButton(
            icon: Icon(
              city.isFavourite ? Icons.favorite : Icons.favorite_outline,
              color: Theme.of(context).colorScheme.secondary,
            ),
            onPressed: () {
              sink.add(SearchScreenIntent.toggleFavorite(city: city));
            },
          ),
          Expanded(child: Text(city.title)),
        ],
      ),
    );
  }
Run the golden test again. You will see that it fails. In the error message it also indicated the percentage diff between the test widget and the reference image.

It also creates a failure directory in the same folder as the test. It has 4 files, two files that show the diff between the reference and test image, and the test and the master image.
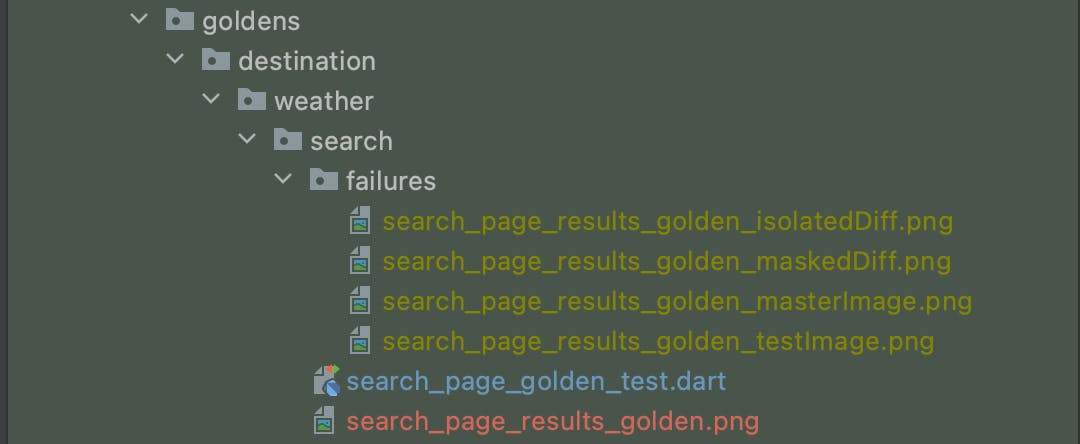
Open the maskedDiff.png file. This image will should you a combined view of both the master and expected images. It also marks the overlapping widgets for easy identification of error.
Open the testImage.png file. This image shows the rendering of the UI in the test. You can see the changes in the icon position that you made earlier.
Now you are able to write golden test and check for difference in you UI in case of any failures.
Don’t forget to revert the changes you made to the UI and also delete the failures folder after you are done inspecting the images.
The Golden Toolkit
The above method of writing golden tests has some drawbacks:
- The default size is not similar to a mobile device.
- It is difficult to test for multiple device sizes at once.
- Text and icons are not rendered.
To solve all of these issues, you will use the golden_toolkit. It is a package that will allow us to render text and icons in tests and also allow testing for multiple device sizes at once.
Add the golden_toolkit dependency to the pubspec.yaml file.
dev_dependencies:
  golden_toolkit: ^0.13.0
Get the dependencies by running flutter pub get.
Golden Tests on multiple devices
To update the test to use the golden_toolkit, replace the testWidgets function by the testGoldens function form the library.
testGoldens(
    "Given search results are not empty, When non empty search term is present, Then results should be displayed",
    (tester) async {
      // Given
      await _loadPageForGolden(tester);

      // When
      ...

      // Then
      ...
            await expectLater(find.byType(SearchPage), matchesGoldenFile("search_page_results_golden.png"));
    },
  );
Next replace the expectLater function call with multiScreenGolden function form the golden toolkit. You need to provide the function with the tester, the name of the images and the list of devices you want to run the test for. These devices could be some default ones the the library gives you or you can create a custom device of your own.
testGoldens(
    "Given search results are not empty, When non empty search term is present, Then results should be displayed",
    (tester) async {
      // Given
      await _loadPageForGolden(tester);

      // When
      ...

      // Then
      ...
            await multiScreenGolden(
        tester,
        "search_page_result",
        devices: [
          Device.iphone11,
          Device.phone.copyWith(name: "smallPhone"),
          const Device(
            name: "custom_device",
            devicePixelRatio: 2,
            size: Size(540, 960),
          ),
        ],
      );
    },
  );
Generate the golden files again by running the following command
flutter test --update-goldens
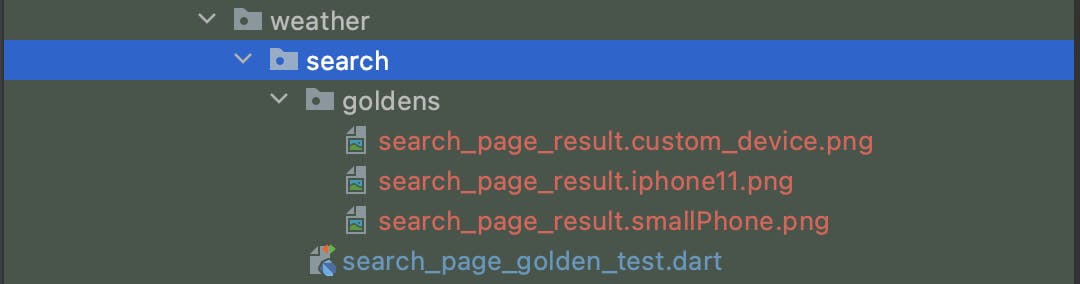
You will see a new goldens directory in the test file’s directory. It contains golden images for all the images specified in the test.
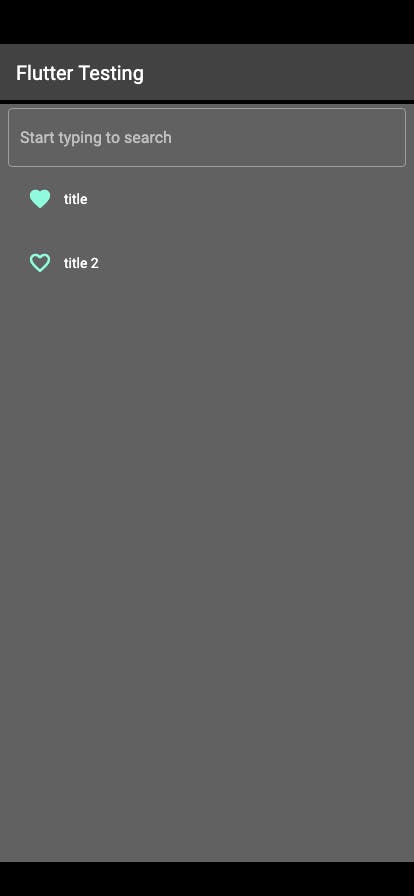
Here is what the iphone11 image looks like.

Next time you run the test, it will compare results for all the devices that you have listed.
Rendering Font in Golden Test
The final problem is to render fonts in golden test. You can solve that as well using the golden_toolkit.
Simply add the loadAppFonts function at the very beginning of the test.
testGoldens(
    "Given search results are not empty, When non empty search term is present, Then results should be displayed",
    (tester) async {
      // Given
      await loadAppFonts();
      await _loadPageForGolden(tester);

      // When
      ...

      // Then
      ...
    },
  );
Update the golden files to create reference images with fonts and icons.
flutter test --update-goldens
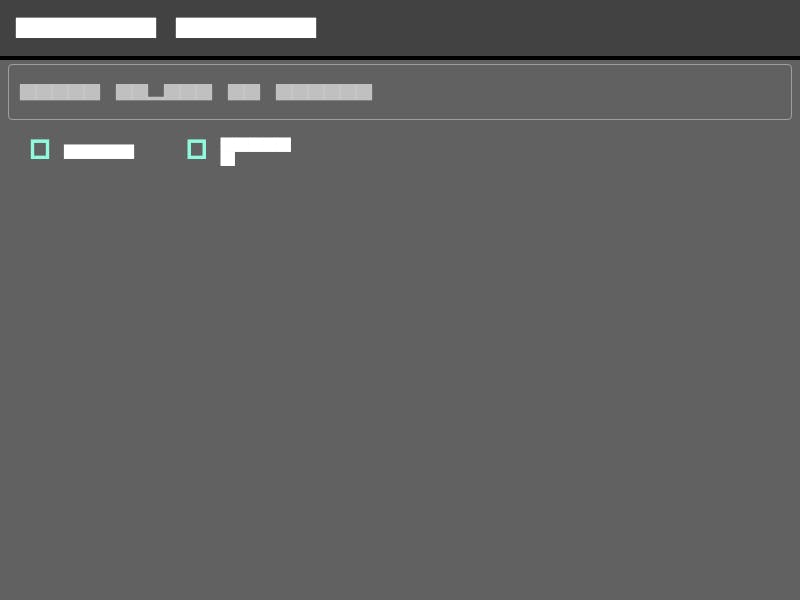
Open any golden file. You will see that the fonts and icons are now rendered as expected.
The golden toolkit is a powerful tool to have in your testing suite. You can make the code more re-usable by extracting theloadAppFonts and multiScreenGolden functions to some common places so that you don’t have to write it in every single test case.
That’s it! You are now capable of writing golden tests for multiple screen sizes and with font rendering.
Where to go from here?
Try to write more test to cover various states or more diverse device sizes.
Checkout the Flutter Template for more examples of testing and a reusable test setup.
You can get the complete code from all 3 parts here.
If you found the series helpful do leave a like and share with anyone who might benefit from this.