

Flutter Testing Part 1: Unit Tests

I'm a software developer learning and exploring various platforms, sharing my learning along the way!
Any piece of software should function reliably. Reliability comes from having a deterministic outcome. One way to bring in reliability to software development is writing tests.
Tests not only help you catch bugs early in development cycle, but makes sure that new code does not break old functionality. It forces you to write modular code.
In this tutorial you will learn to write unit tests for a flutter application.
Starter Project
Clone the starter project from here. The repo is based on the Wednesday Flutter Template but is trimmed down for the purpose of this tutorial.
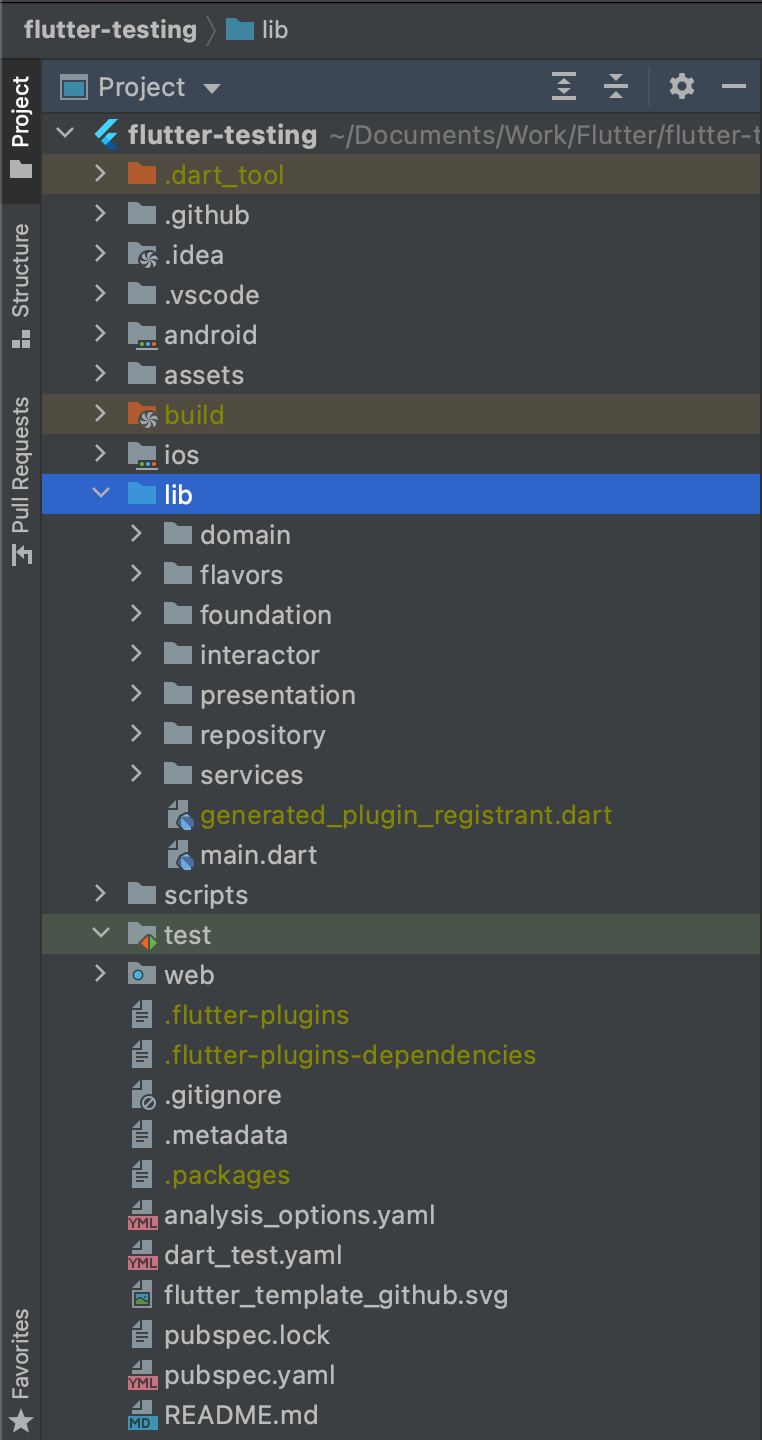
Once you clone the project, open it in VS Code or Android studio and checkout the unit-test-start branch. You will see the following directory structure.
Build and run the application. You should see an app as shown below run on your simulator/emulator.
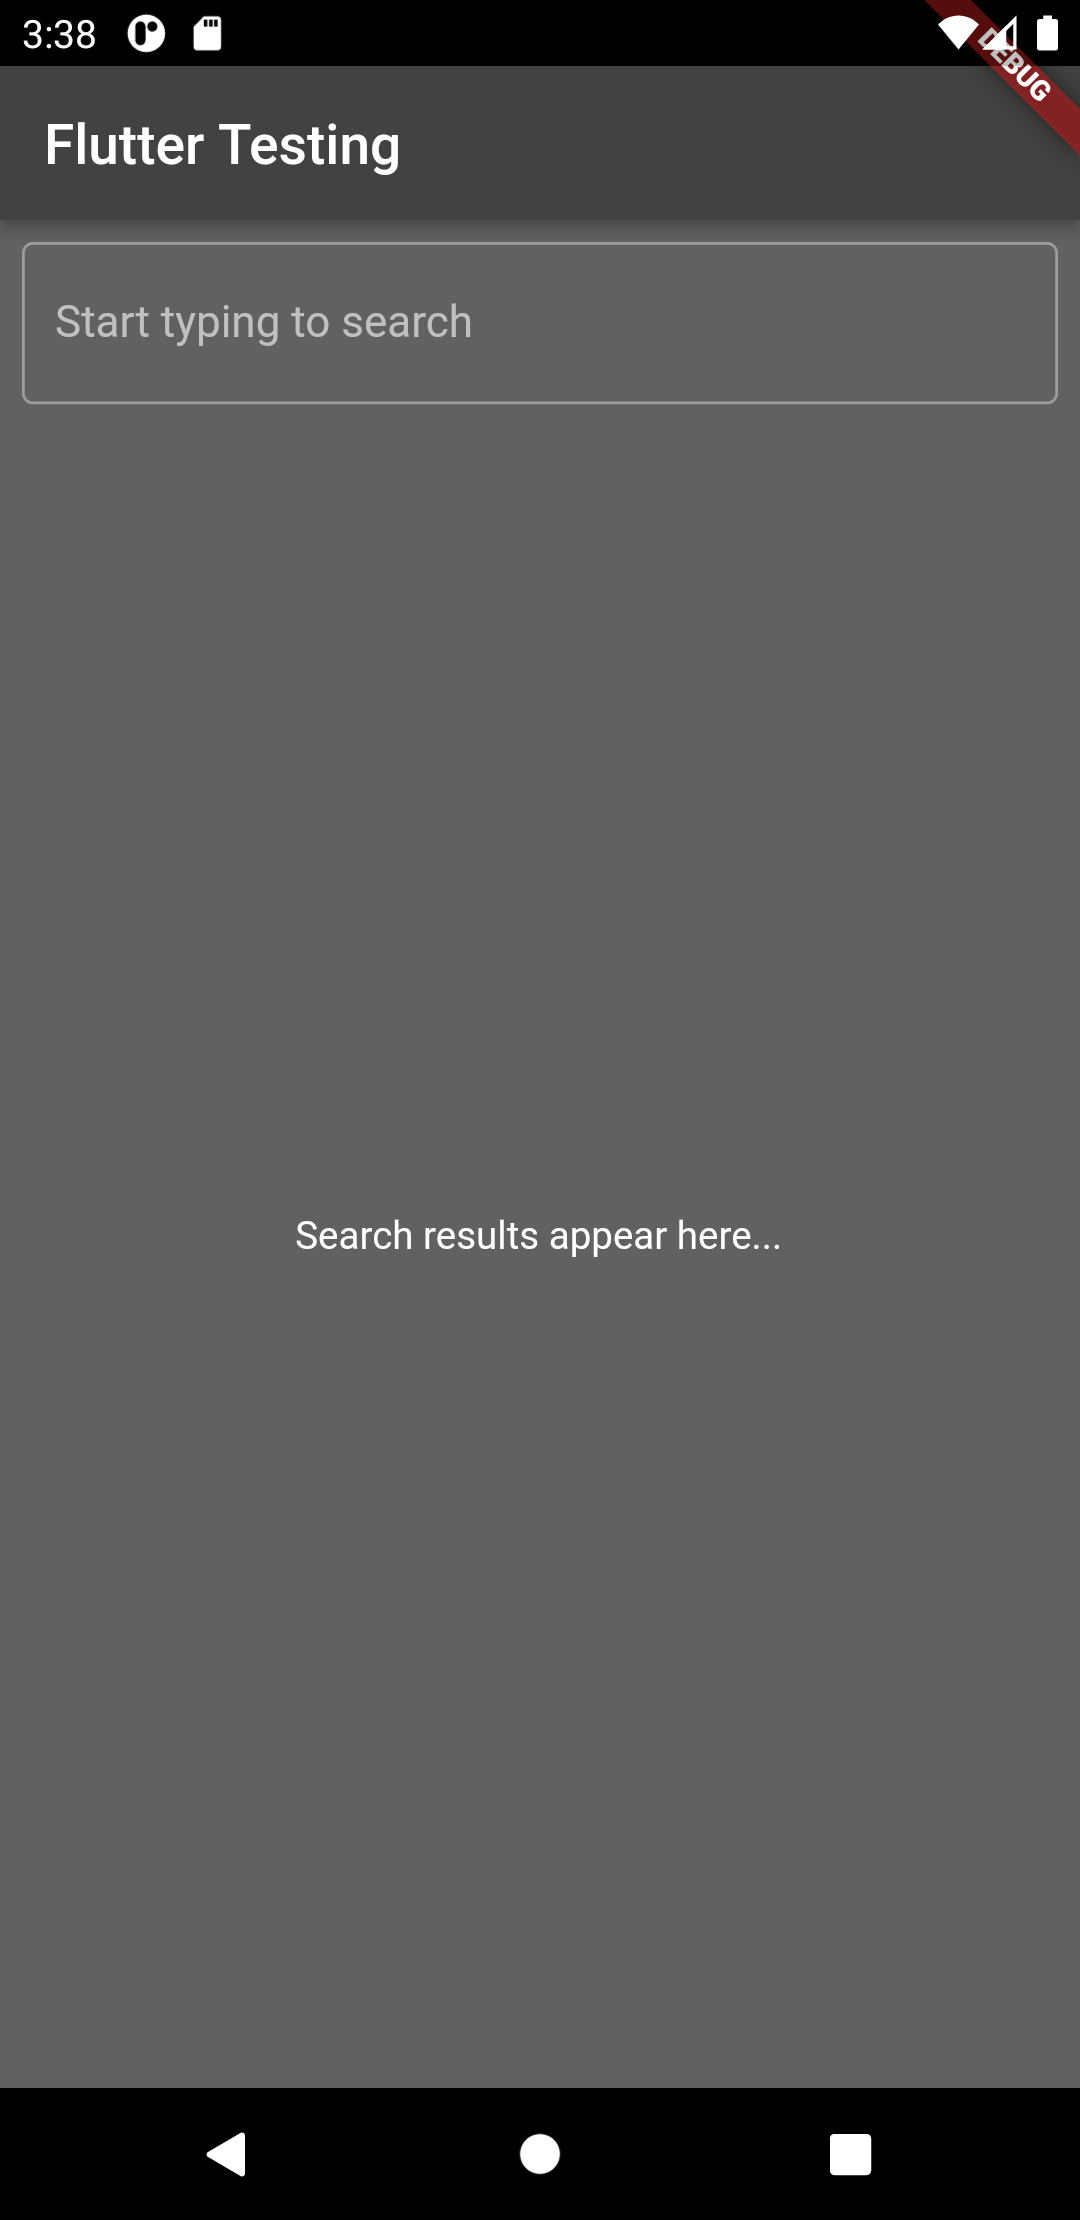
Play with the application to understand what it does.. Search for any city in the search box and mark a few as favourites.
What are unit tests?
A unit test is a test that verifies the behaviour of a small and isolated piece of code. Small and Isolated are 2 important parameters to consider while writing a unit test.
A unit test will usually target a single function. Any inputs to the function will be provided by you while writing the test. Any dependencies, such as other functions that are called internally, should be mocked.
Unit tests are quick to run and don’t require a lot of setup.
In a production application, the quantity of unit tests will be much higher than any other types of tests.
Writing testable code
Before you proceed with writing any test cases, you need to make sure that the code you are writing is testable in the first place.
Consider the following example. We have a Calculator class with a function called add. The calculator class internally creates an object of the CalculatorAPIService to perform the calculations.
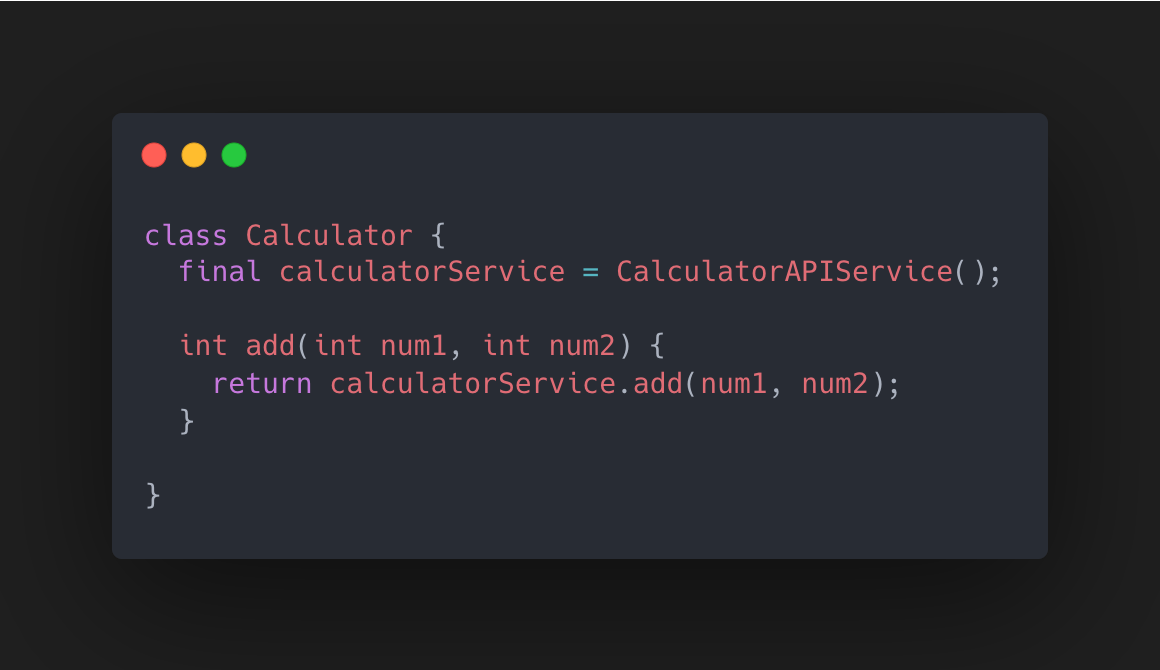
This is bad for testing the add function because we do not have control over the CalculatorAPIService.
- Any failure in the CalculatorAPIService can fail our test.
- The CalculatorAPIService may have more dependencies of its own which will need to be created as well.
- Testing failure conditions may depend on CalculatorAPIService. Testing for error states will become difficult.
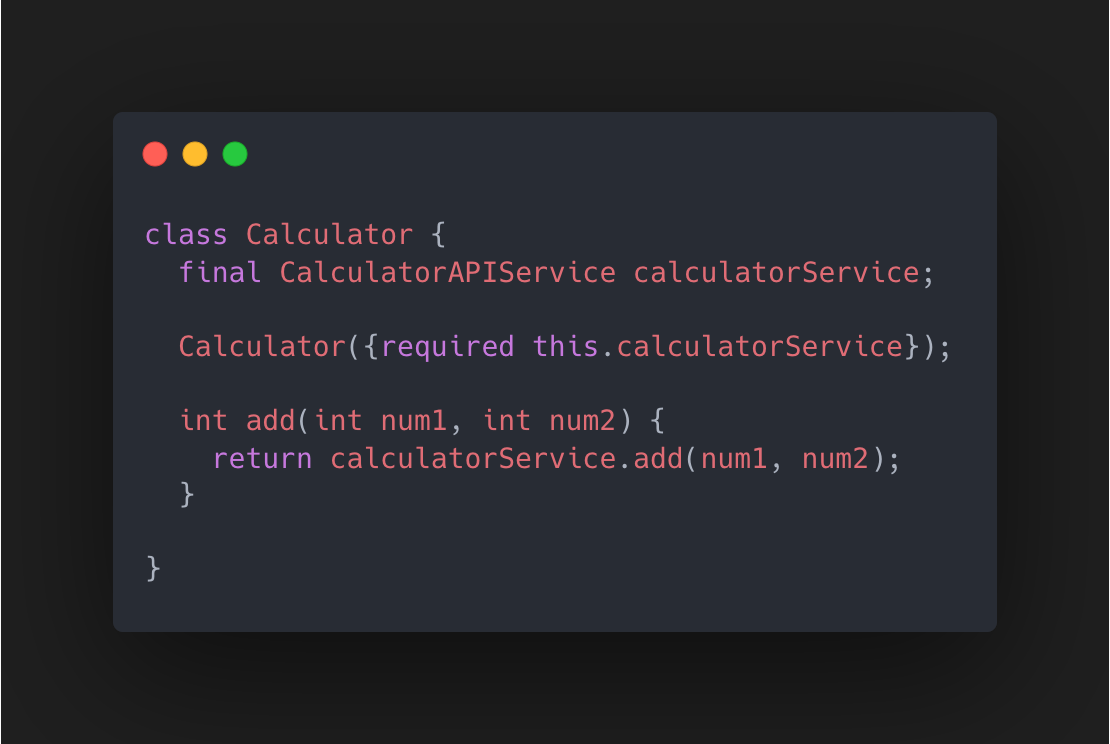
The way to solve this problem is using the principle of Dependency Injection or Inversion of Control. Instead of letting the Calculator class create its own dependencies, we provide it to the class via its constructor.
Going over the concepts of Dependency Injection is out of scope of this tutorial. In this repo we are using get_it as the Dependency Injection solution and you can read more about it here.
Why mock?
Mocking means replacing the dependencies of the piece of code under test, with a fake or duplicate version that we have control over.
Mocking the dependencies of the subject under test will let you achieve predictable behaviour on every run of a test. With a mock, you can have a function return a particular value or throw an error whenever you want. Mocks also allow us to verify if a particular function was called a certain number of times. You will see all of this in practice when you write actual tests in the following sections.
With the above setup in place, you can now pass the mock version of the dependencies to the class under tests. You will use mocktail to mock the required dependencies. You can read more about mocktail here.
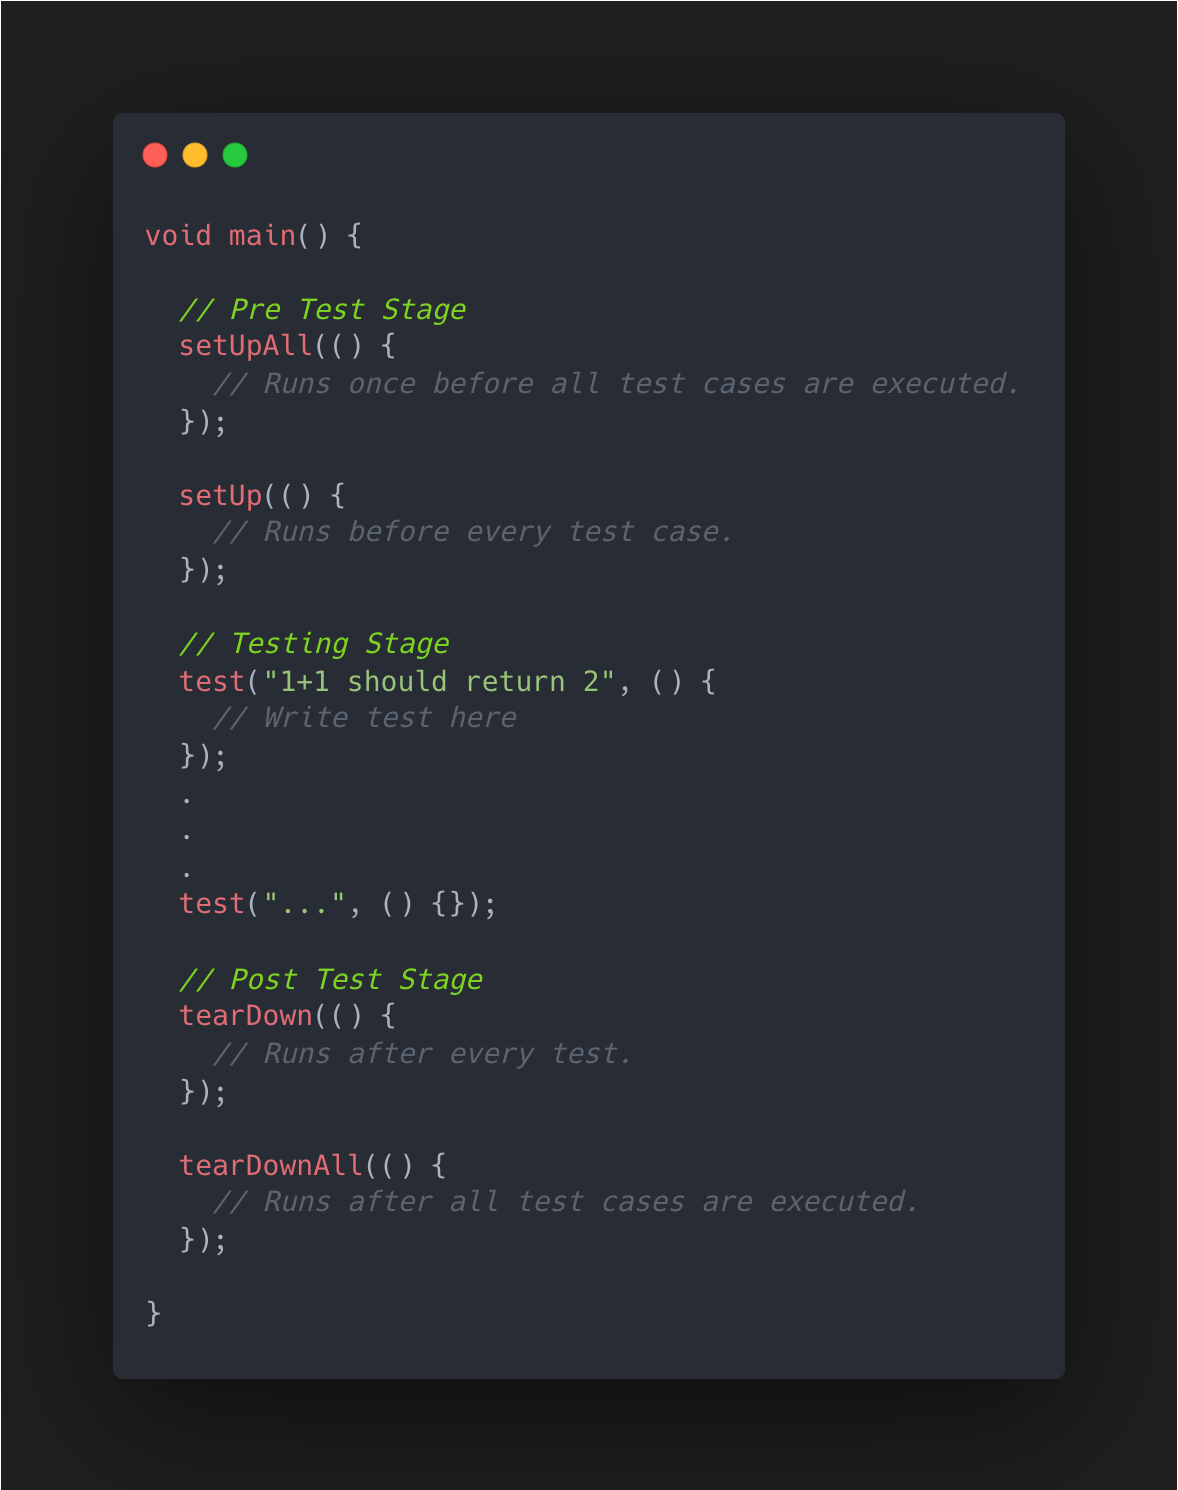
Anatomy of a unit test
Every unit test file has some common structure. It can be broadly divided into 3 stages, the pre test stage, the testing stage, and the post test stage.
- Pre test stage is for test setup, like initialising mocks, initialising the class under test, etc.
- Then in the testing stage all the test cases are executed.
- Post test stage is for cleanup, like resetting all mock values.
Creating a test file
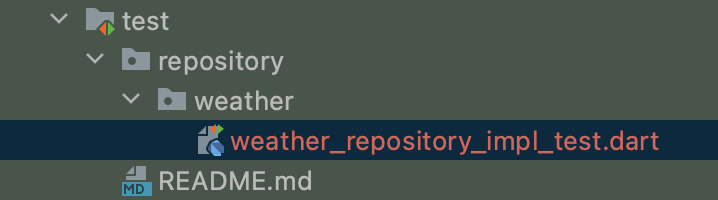
In flutter, all test files must end with _test.dart and must be put under the test directory.
You will see an empty test directory in the starter project. This is where we will write all the testing code.
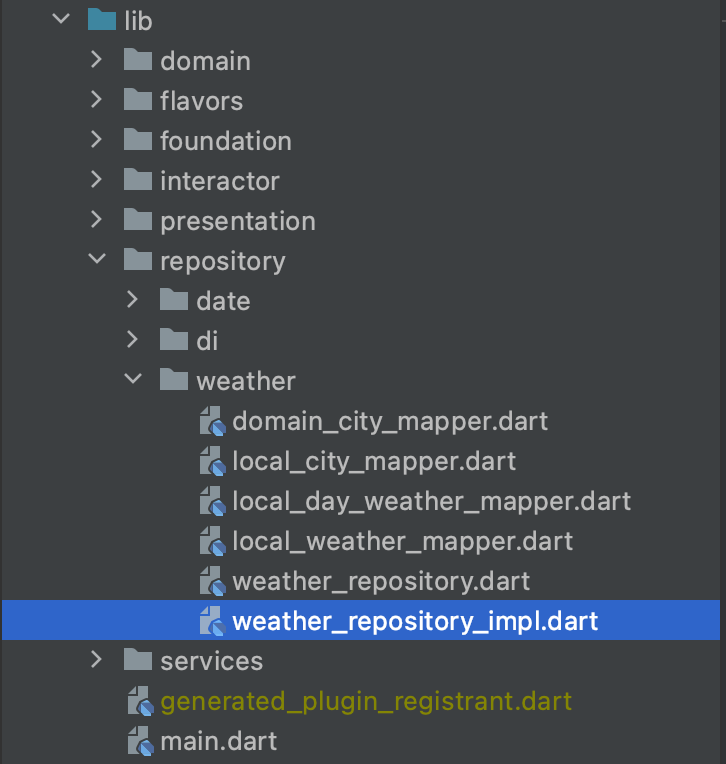
You will write tests for weather_repository_impl.dart. It is located at repository/weather.
It is a good idea to mimic the directory structure of lib in test as it makes it easier to locate relevant test files.
Since weather_repository_impl.dart in located in lib/repository/weather, create a new file weather_repository_impl_test.dart in test/repository/weather.
Add a main method. All test code should be inside this main method.
void main() {
  // Test code here!
}
Initial test setup
To test a function in the weather_repository_impl.dart we first need to create an instance of the repository. The setUp function is the perfect place to do it.
Add the setUp function to the test file you created and create an instance of WeatherRepositoryImpl here.
import 'package:flutter_test/flutter_test.dart';
import 'package:flutter_testing/repository/weather/weather_repository_impl.dart';

void main() {
  late WeatherRepositoryImpl weatherRepository;

  setUp(() {
    weatherRepository = WeatherRepositoryImpl();
  });
}
You will notice that the WeatherRepositoryImpl requires some other classes to be passed in its constructor. Since you are testing only the WeatherRepositoryImpl class here, you do not want any other classes to influence the result of a test case. This is where mocking plays an important role. We will provide all the dependencies as mocks so that we can control their behaviour as required.
You will use mocktail as the mocking library. Open pubspec.yaml and add the mocktail dependency to the dev_dependencies section. Don’t forget to run flutter pub get after adding the dependency.
dev_dependencies:
  mocktail: ^0.3.0
    # other dependencies
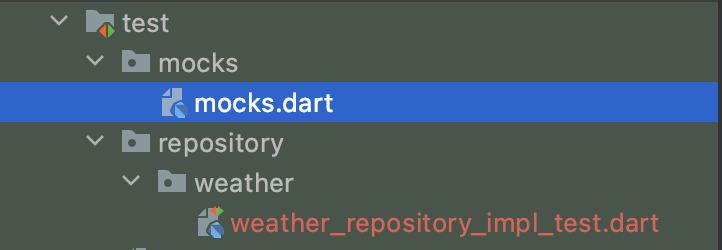
- Mocks can be reused in multiple test files, so it’s better to extract them to a separate file. Create a new director under
testcalledmocksand add a file calledmocks.dartto that directory.
- The
WeatherRepositoryImpla couple of services, a few mappers and a repository as its dependencies. Services are classes that give access to data sources. Mappers are classes that convert service data classes to domain data classes. Create mocks for all the dependencies. To create a mock just extends theMockclass. Here we will also implement the interface that is used by the original class so that it is identified as a valid object.
import 'package:flutter_testing/repository/date/date_repository.dart';
import 'package:flutter_testing/repository/weather/domain_city_mapper.dart';
import 'package:flutter_testing/repository/weather/local_city_mapper.dart';
import 'package:flutter_testing/repository/weather/local_day_weather_mapper.dart';
import 'package:flutter_testing/repository/weather/local_weather_mapper.dart';
import 'package:flutter_testing/services/weather/local/weather_local_service.dart';
import 'package:flutter_testing/services/weather/remote/weather_remote_service.dart';
import 'package:mocktail/mocktail.dart';

// Service
class MockWeatherLocalService extends Mock implements WeatherLocalService {}

class MockWeatherRemoteService extends Mock implements WeatherRemoteService {}

// Mappers
class MockDomainCityMapper extends Mock implements DomainCityMapper {}

class MockLocalCityMapper extends Mock implements LocalCityMapper {}

class MockLocalWeatherMapper extends Mock implements LocalWeatherMapper {}

class MockLocalDayWeatherMapper extends Mock implements LocalDayWeatherMapper {}

// Repositories
class MockDateRepository extends Mock implements DateRepository {}
- With the mocks declared, you can now go back to
weather_repository_impl_test.dartand use the mocks as dependencies to theWeatherRepositoryImplclass.
void main() {
    late WeatherLocalService weatherLocalService;
  late WeatherRemoteService weatherRemoteService;
  late DomainCityMapper domainCityMapper;
  late LocalCityMapper localCityMapper;
  late LocalWeatherMapper localWeatherMapper;
  late LocalDayWeatherMapper localDayWeatherMapper;
  late DateRepository dateRepository;

  late WeatherRepository weatherRepository;

  setUp(() {
    weatherLocalService = MockWeatherLocalService();
    weatherRemoteService = MockWeatherRemoteService();
    domainCityMapper = MockDomainCityMapper();
    localCityMapper = MockLocalCityMapper();
    localWeatherMapper = MockLocalWeatherMapper();
    localDayWeatherMapper = MockLocalDayWeatherMapper();
    dateRepository = MockDateRepository();

    weatherRepository = WeatherRepositoryImpl(
      weatherLocalService: weatherLocalService,
      weatherRemoteService: weatherRemoteService,
      domainCityMapper: domainCityMapper,
      localCityMapper: localCityMapper,
      localWeatherMapper: localWeatherMapper,
      localDayWeatherMapper: localDayWeatherMapper,
      dateRepository: dateRepository,
    );
  });
}
- Also add the
tearDownfunction to reset any state that might have been persisted in the mocks.
void main() {
    setUp(() {
        // setUp code
    });

    tearDown(() {
    resetMocktailState();
  });
}
That was a lot of setup steps. Fortunately you won’t have to do this every time as some of this setup (like the mocks) can be shared between multiple test files.
Now you are ready to write your first test!
Writing a unit test
- The first step to writing a unit test is to pick the unit of code that you want to test. For your first test, let’s pick the
setCityAsFavoritefunction from the very bottom ofWeatherRepositoryImpl.
@override
  Future<void> setCityAsFavorite(City city) async {
    await weatherLocalService.markCityAsFavorite(
      city: localCityMapper.map(city),
    );
  }
- Once you choose the unit of code, identity the steps involved in it. Doing so helps in determining what parts to mock and what parts to verify during a test.
setCityAsFavoriteaccepts aCityas input.- It then converts the
CitytoLocalCityby callinglocalCityMapper.mapfunction. - Then it calls
markCityAsFavoriteon theweatherLocalServicewith the result of the map function.
- You will use the
testfunction which will run every time we callflutter test. It accepts 2 parameters, the name of the test and the actual test code itself. You will use theGiven, When, Thenpattern to describe a test. It breaks down a test into 3 partsGivensome contextWhensome action is carried outThena particular set of action should occur.
- Write a new test by calling the
testfunction. You will name it in theGiven, When, Thenpattern.
test("Given a valid City object, When setCityAsFavorite is called and no error occurs, Then markCityAsFavorite is called with LocalCity object", () {
  // Given

  // When

  // Then
});
- Since the
weatherLocalServiceis a mock object, calling any functions in it will not return any values. You need to tell the mocking library what value should be returned when a particular function is called with a certain set of arguments. For doing this you will also create some data objects with dummy data. For the current test function we need the theCityand theLocalCityCompaniondata objects.
test("Given a valid City object, When setCityAsFavorite is called and no error occurs, Then markCityAsFavorite is called with LocalCity object", () {
    // Given
    final testCity = City(
      id: 1,
      title: "title",
      locationType: "locationType",
      location: "location",
    );
    const testLocalCity = LocalCityCompanion(
      woeid: Value(1),
      title: Value("title"),
      locationType: Value("locationType"),
      location: Value("location"),
    );

    // When

    // Then
  });
- To tell the mocking library that when
localCityMapper.mapis called withtestCity, it should return thetestLocalCity, we will use thewhenfunction frommocktaillibrary. You can usethenReturnto return normal values. To return future or stream values, you need to use thethenAnswerfunction. SincemarkCityAsFavoritereturns aFuture<void>we just use an empty async function inthenAnswer. You can read more aboutmocktailsyntax here.
test(
      "Given a valid City object, When setCityAsFavorite is called and no error occurs, Then markCityAsFavorite is called with LocalCity object",
      () {
    // Given
    final testCity = City(...);
    const testLocalCity = LocalCityCompanion(...);
    when(() => localCityMapper.map(testCity)).thenReturn(testLocalCity);
        when(() => weatherLocalService.markCityAsFavorite(city: testLocalCity)).thenAnswer((_) async {});

        // When

    // Then
  });
- With the mock setup done, you need to call the actual function under test. Call the
setCityAsFavoritefunction, withtestCityas the argument. Also assetCityAsFavoriteis async, mark the test function as async as well.
test(
      "Given a valid City object, When setCityAsFavorite is called and no error occurs, Then markCityAsFavorite is called with LocalCity object",
      () async {
    // Given
    ...
        ...

    // When
    await weatherRepository.setCityAsFavorite(testCity);

    // Then
  });
- Final step in writing a test is to verify that the expected function calls were made and the expected data was returned. Since the function you are testing here does not return anything, we will look at how to check for that in a later test case. For now, let’s verify that both the
markCityAsFavoriteand themapfunction was called once with theverifyfunction.
test(
      "Given a valid City object, When setCityAsFavorite is called and no error occurs, Then markCityAsFavorite is called with LocalCity object",
      () async {
    // Given
    ...
        ...

    // When
    ...
        ...

    // Then
    verify(() => localCityMapper.map(testCity)).called(1);
    verify(() => weatherLocalService.markCityAsFavorite(city: testLocalCity)).called(1);
    verifyNoMoreInteractions(localCityMapper);
    verifyNoMoreInteractions(weatherLocalService);
    verifyZeroInteractions(weatherRemoteService);
  });
- The
verifyNoMoreInteractionsfunction checks that no more function calls happen on the given mock and theverifyZeroInteractionschecks the no function was ever called on the given mock for the entire duration of the test. - You can now run the test by pressing the green button next to the test function or by running
flutter test.

- The test should pass. You should see a similar output in the console.

Expecting results in unit test
- Create a new test for the
getFavoriteCitiesListfunction. The structure will be the same as before: creating test data, mocking function return values, calling the function under test, verifying expected function calls.
test(
      "Given local service returns list of LocalCityData, When getFavoriteCitiesList is called, Then Future<List<City>> is returned",
      () async {
    // Given
    final localCityData = [
      LocalCityData(
        woeid: 1,
        title: "title",
        locationType: "locationType",
        location: "location",
      )
    ];
    final cityData = [
      City(
        id: 1,
        title: "title",
        locationType: "locationType",
        location: "location",
      )
    ];
    when(() => weatherLocalService.getFavouriteCities())
        .thenAnswer((_) => Future.value(localCityData));
    when(() => domainCityMapper.mapList(localCityData)).thenReturn(cityData);

    // When
    final result = await weatherRepository.getFavoriteCitiesList();

    // Then
    verify(() => weatherLocalService.getFavouriteCities()).called(1);
    verify(() => domainCityMapper.mapList(localCityData)).called(1);
  });
- The current function under test also returns a result. For such functions it is important to check that the return value is as expected. To do that we will use the
expectfunction. Theexpectfunction can check a range of values, you can read more about it here. - Add the following expect functions to check if the returned results is valid. In the first expect we are checking the length of the list returned and in the second expect we are checking the entire result itself.
test(
      "Given local service returns list of LocalCityData, When getFavoriteCitiesList is called, Then Future<List<City>> is returned",
      () async {
    // Given
    ...
        ...

    // When
    ...
        ...

    // Then
    verify(() => weatherLocalService.getFavouriteCities()).called(1);
    verify(() => domainCityMapper.mapList(localCityData)).called(1);
        expect(result.length, localCityData.length);
    expect(result, cityData);
  });
- Running this test should give the following result

Expecting exceptions
- In some situations, you may want to check that if a particular function throws an exception, then how does the function under test handle it.
- Create one more test for
setCityAsFavorite. You will test the condition where if thelocalCityMapperthrows an exception, that exception is surfaced bysetCityAsFavorite. For this you will instruct the mock to throw an exception instead of returning a value using thethenThrowmethod.
test(
      "Given setCityAsFavorite is called with a valid City object, When localCityMapper throws an exception, Then the same exception is surfaced to the caller",
          () async {
        // Given
        final testCity = City(
          id: 1,
          title: "title",
          locationType: "locationType",
          location: "location",
        );
        final testException = Exception("Test exception");
        when(() => localCityMapper.map(testCity)).thenThrow(testException);

        // When


        // Then

      });
- To test a function throws an exception, you need to combine the
whenandthensteps into a single expect block.
test(
      "Given setCityAsFavorite is called with a valid City object, When localCityMapper throws an exception, Then the same exception is surfaced to the caller",
      () async {
    // Given
    ...
        ...

    expect(
      // When
      () async => await weatherRepository.setCityAsFavorite(testCity),
      // Then
      throwsA(same(testException)),
    );
  });
That’s it! You are now capable of writing unit tests for any situation.
As you might have noticed, many test require the same dummy data. You can extract these dummy test data objects into a separate file for easy re-use.
Where to go from here?
To get the complete code form this tutorial, checkout the unit-test-end branch of the repo or view it on GitHub.
You can checkout the original repo, this test repo is based on at Wednesday Flutter Template.
In Part 2, we will look at testing flutter widgets. Stay tuned!
If you found this article helpful, do drop a like and share with your fellow developers.


![[Part 2] Testing Coroutines and Kotlin Flows](/_next/image?url=https%3A%2F%2Fcdn.hashnode.com%2Fres%2Fhashnode%2Fimage%2Fupload%2Fv1637587041933%2FlfO62ZVz2.png&w=3840&q=75)